
Dell™ Latitude™ D820 Service Manual
|
|
CAUTION: Before you begin any of the procedures in this section, follow the safety instructions in the Product Information Guide. |

|
NOTICE: If your computer has only one memory module, install the memory module in the connector labeled "DIMM A." |
|
|
NOTICE: If you remove your original memory modules from the computer during a memory upgrade, keep them separate from any new modules that you may have, even if you purchased the new modules from Dell. If possible, do not pair an original memory module with a new memory module. Otherwise, your computer may not function at optimal performance. |

|
NOTE: Memory modules purchased from Dell are covered under your computer warranty. |
The computer has two memory slots, DIMM A and DIMM B. DIMM A is located on top of the computer under the keyboard, and DIMM B is located on the bottom of the computer under the memory module cover. DIMM A holds the basic memory module as configured from the factory. If you did not order additional memory, DIMM B is empty. Generally, if you add memory, you use DIMM B. If you are upgrading memory, you may need to install memory in DIMM A and DIMM B, depending on the extent of the upgrade.
To install a memory module in DIMM A:
|
|
NOTICE: If you leave the area, ground yourself again when you return to the computer. |
|
|
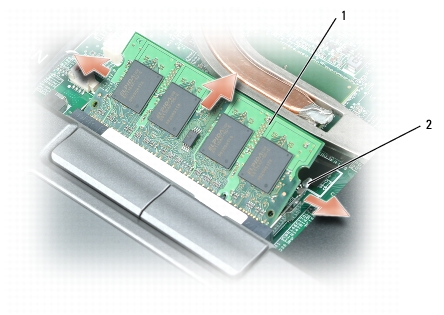
NOTICE: To prevent damage to the memory module connector, do not use tools to spread the memory- module securing clips. |
|
1 |
memory module |
2 |
securing clips (2) |
|
|
|
|
NOTICE: Insert memory modules at a 45-degree angle to avoid damaging the connector. |
|
|
NOTE: If the memory module is not installed properly, the computer may not boot properly. No error message indicates this failure. |
As the computer boots, it detects the additional memory and automatically updates the system configuration information.
To confirm the amount of memory installed in the computer, click Start® Control Panel® System.
To install a memory module in DIMM B:
|
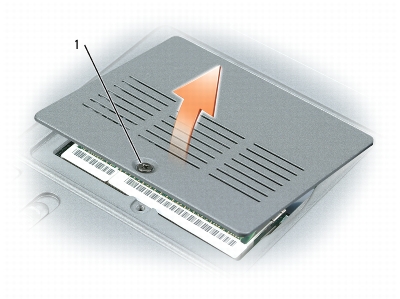
1 |
captive screw on memory module cover |
|
|
NOTICE: To prevent damage to the memory module connector, do not use tools to spread the memory-module securing clips. |

|
1 |
memory module |
2 |
securing clips (2) |
|
|
NOTICE: If you need to install memory modules in two connectors, install a memory module in the connector labeled "DIMMA" before you install a module in the connector labeled "DIMMB." Insert memory modules at a 45-degree angle to avoid damaging the connector. |
|
|
NOTE: If the memory module is not installed properly, the computer may not boot properly. No error message indicates this failure. |
|
|
NOTICE: If the cover is difficult to close, remove the module and reinstall it. Forcing the cover to close may damage your computer. |
As the computer boots, it detects the additional memory and automatically updates the system configuration information.
To confirm the amount of memory installed in the computer, click the Start button, click Help and Support, and then click Computer Information.