Back to Contents Page

System Board

Dell™ Latitude™ D820  Service Manual

  Removing the System Board

  Installing the System Board


Removing the System Board

CAUTION: Before performing the following procedures, follow the safety instructions in the Product Information Guide.
CAUTION: To prevent static damage to components inside your computer, discharge static electricity from your body before you touch any of your computer's electronic components. You can do so by touching an unpainted metal surface.

The system board's BIOS chip contains the Service Tag, which is also visible on a barcode label on the bottom of the computer. The replacement kit for the system board includes a CD that provides a utility for transferring the Service Tag to the replacement system board.
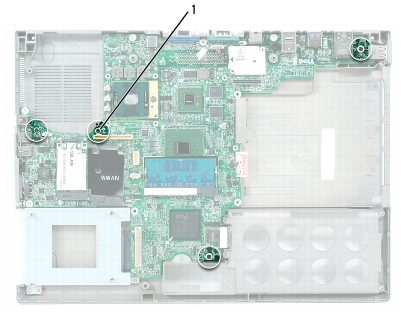
  1. Follow the instructions in Before Working Inside Your Computer.

  2. Remove the hard drive (see Hard Drive).

  3. Remove the hinge cover (see Hinge Cover).

  4. Remove the keyboard (see Keyboard).

  5. Remove the display assembly (see Display Assembly).

  6. Remove the DIMM A and DIMM B memory modules (see Memory).

  7. Remove any installed wireless communications cards (see Communications Cards).

  8. Remove the palm rest (see Palm Rest).

  9. Remove the modem (see Modem).

  10. Remove the card reader (see PC Card Reader).

  11. Remove the processor thermal-cooling assembly (see Processor Thermal-Cooling Assembly).

  12. Remove the processor (see Removing the Processor Module).

  13. Remove the four M2.5 x 5-mm system board screws.

1

M2.5 x 5-mm screws (4)

  1. Remove the four hex screws on the back of the computer.

  1. Lift the system board out and away from the base.


Installing the System Board

  1. Perform all the steps in Removing the System Board in reverse order.

NOTE: When installing the system board, ensure that you align the wireless switch on the base with the switch on the system board.
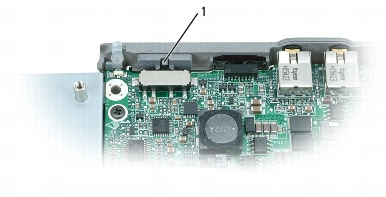
1

wireless switch

  1. Insert the battery into the battery bay.

  2. Connect the AC adapter to the computer and to an electrical outlet.

NOTICE: Before turning on the computer, replace all screws and ensure that no stray screws remain inside the computer. Failure to do so may result in damage to the computer.
  1. Turn on the computer.

NOTE: After replacing the system board, enter the computer Service Tag into the BIOS of the replacement system board.
  1. Insert the CD that accompanied the replacement system board into the appropriate drive. Follow the instructions on the screen.


Back to Contents Page